Have we ever tried to convince a drone to carry a second camera without throwing a tantrum?
Why This Little Mount Exists
We have a habit of asking our gadgets to do things they didn’t exactly sign up for. The DJI Mini 4 Pro is a marvel of careful engineering, and like a polite houseguest, it tends to behave best when left unburdened. Yet here we are, asking it to carry a GoPro, or a Pocket camera, or a small light, as if we were dressing a cat in a holiday sweater. The BTG DJI Mini 4 Pro Drone Action Camera Mount Holder makes that audacious request seem reasonable.
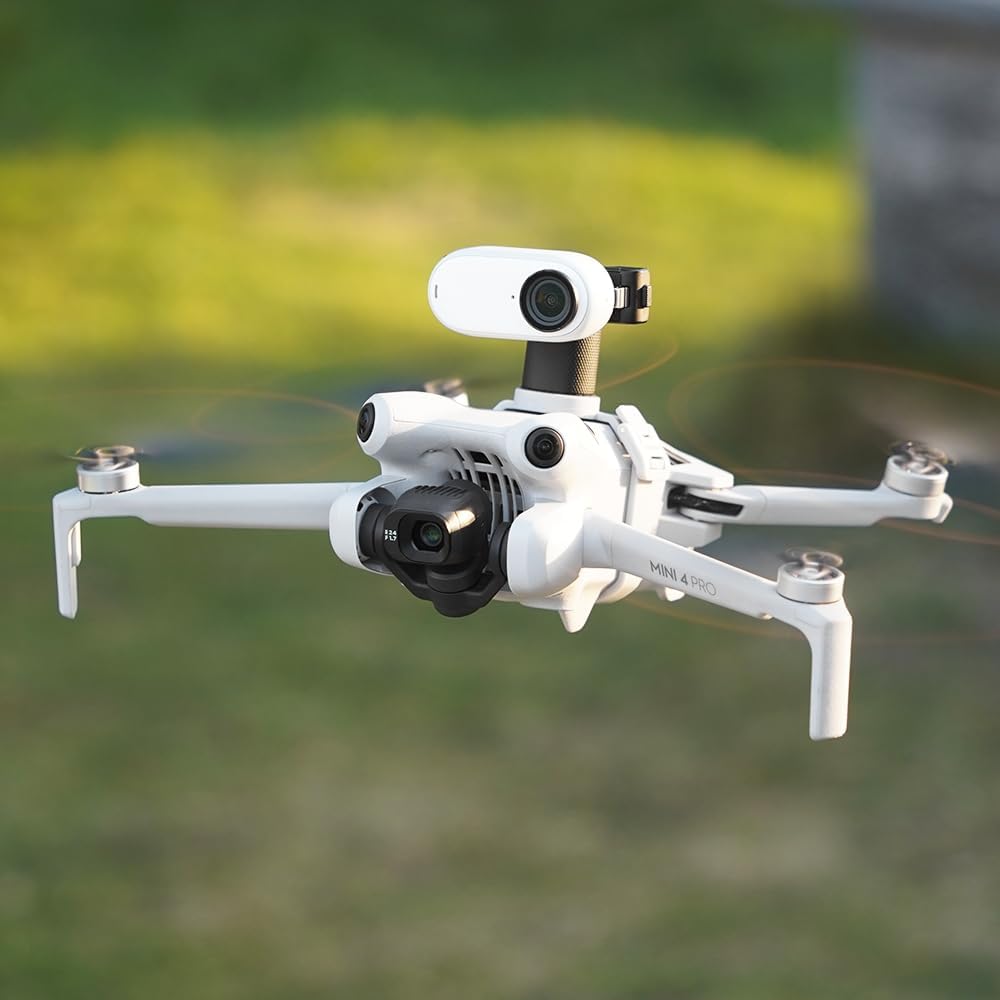
This tiny attachment solves a very specific problem: we want more angles, more lighting options, and new creative possibilities without rebuilding our entire flying setup. If the Mini 4 Pro is our nimble scout, this mount turns it into a multipurpose mule, happy to tote a sport camera or little lamp wherever our shots demand.
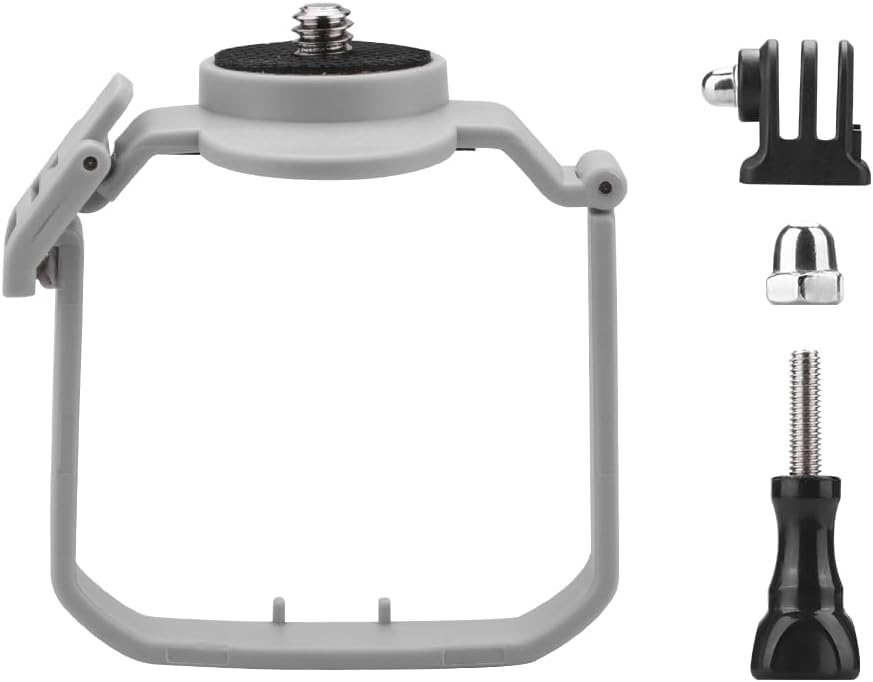
BTG DJI Mini 4 Pro Drone Action Camera Mount Holder for DJI OSMO Action 4 3/Pocket 3 2 /GoPro Series/Fimi Palm 1, 2 / Insta360 ONE X3 X2/ONE R/Night Light/Fill Light Sport Camera Mount
What We’re Reviewing Exactly
We’re talking about the “BTG DJI Mini 4 Pro Drone Action Camera Mount Holder for DJI OSMO Action 4 3/Pocket 3 2 /GoPro Series/Fimi Palm 1, 2 / Insta360 ONE X3 X2/ONE R/Night Light/Fill Light Sport Camera Mount.” The name alone feels like a packing list, which is appropriate, because that’s how it behaves: a dependable go-between for the Mini 4 Pro and a wide range of small cameras and accessories.
It’s designed specifically for the DJI Mini 4 Pro and works with:
- GoPro Series action cameras
- DJI Osmo Action (4, 3, and 2)
- DJI Pocket 3/2/1
- Insta360 series (ONE X3, X2, ONE R)
- Fimi Palm 2/1
- Night or fill lights with a 1/4-inch thread
In the box, we get one set of the adapter mount. The drone and everything else we see in pictures are not included, though we can forgive ourselves for daydreaming otherwise. The mount includes a standard action-camera-style adapter with a long screw, plus a “gift” 1/4-inch adapter for devices with a threaded base—like Pocket cameras, Insta360 ONE X3, or compact lights.
Compatibility in Plain English
We appreciate products that play well with others, and this one’s a social butterfly. It speaks two essential mounting languages: the classic GoPro-style two-prong/fork interface (secured with a long screw), and the universal 1/4-inch tripod screw. That means one mount can host a wide array of cameras and lighting tools without turning our backpack into a drawer full of adapters.
Below is a breakdown of what fits, how it mounts, and what to expect.
| Device Type | Example Models | Attachment Needed | Notes |
|---|---|---|---|
| Action Cameras (GoPro style) | GoPro HERO series, Osmo Action 4/3/2, Insta360 ONE R (with action mod) | Standard action camera adapter + long screw (included) | Solid, familiar fit; quick tilt adjustments via the long screw |
| 360 Cameras | Insta360 ONE X3, X2 | 1/4-inch adapter (included) | Mount vertically for best stitching; check prop visibility in 360 |
| Pocket Gimbal Cameras | DJI Pocket 3/2/1, Fimi Palm 1/2 | 1/4-inch adapter (included) | Watch for gimbal clearance; minimize wind resistance with careful positioning |
| Compact Lights | Night light, fill light with 1/4-inch thread | 1/4-inch adapter (included) | Excellent for twilight or indoor mapping; be mindful of night flying rules |
We know—reading a table about screws is not how we imagined spending our weekend either. Still, it’s oddly reassuring to see that two little interfaces unlock such a wide world of options.
Design and Build: Close Fit, Feather Light
This is a close-fitting mount made of tough, wear-resistant material that doesn’t give up when our bag develops that alarming rattle of cables and memory card cases. It hugs the Mini 4 Pro’s body without fuss and, crucially, it does not block the drone’s downward vision sensor. That’s not a small promise. If we’ve ever seen a drone refuse to take off because it thinks the ground is a cliff, we know why keeping those sensors clear matters.
The mount weighs a svelte 13 grams. We like to say it’s basically a feather with a resume. On a drone where every gram affects performance, that matters. The mount itself adds negligible burden; what we put on it—that’s the real decision point.
The Standard Action Camera Adapter
The included action-camera-style head is the one most of us can tighten with our eyes closed. The long screw passes through the forked lugs of the camera cage or frame and secures into the mount head. Tightening it feels familiar, and the small tilt adjustments are quick. We don’t need a microdegree of tilt precision—just enough to frame that skyline or trail run without the horizon sloping like a careless watercolor.
The “Gift” 1/4-Inch Adapter
We’re charmed that they call it a gift. It’s a useful one. Many compact cameras and virtually all small lights expect a standard 1/4-inch threaded socket. We screw this adapter into the mount head and then screw our device onto the adapter. That’s two twists instead of one, and a wider universe of gadgets opens up.
Installation: From Box to Takeoff
Attaching the mount is a straightforward ritual, the kind we can manage in a parked car with a coffee balanced on the dash and only a slight sense of panic.
- Place the Mini 4 Pro on a clean, flat surface with the front facing away from us.
- Align the mount to the intended mounting point (it’s designed to sit flush and secure against the drone’s body).
- Clip or slide it in until it sits snugly. The close fit does most of the heavy lifting.
- Decide which adapter we need: action camera fork or 1/4-inch. Attach that to the mount head.
- Secure our camera/light on the adapter, tighten gently but firmly.
- Check clearances: props, sensors, and the gimbal should all be free and happy.
- Power on the drone and perform a brief hover test in hand or over a soft surface.
The goal is zero wobble, zero rubbing, and zero surprises. If anything squeaks or shifts, we go back, loosen, realign, and retighten. We’re fans of the light touch—overtightening can stress plastic; under-tightening risks mid-air knocks.
Does It Block the Downward Sensor?
In design and in practice, the mount doesn’t block the Mini 4 Pro’s downward vision system. That’s the little orchestra that helps the drone hold position and land with grace. We still make a habit of checking sensor views in the DJI app. A quick peek before takeoff is more effective than a longer stare after an expensive bounce.
Balance and Center of Gravity
The Mini 4 Pro expects its weight to be centered. By adding a camera or light, we’re shifting the center of gravity. That’s not a dealbreaker—the mount’s snug fit keeps things stable—but we can help by:
- Keeping accessories as close to the drone’s centerline as possible.
- Tightening the adapter just enough to prevent tilt drift.
- Avoiding larger, top-heavy devices that act like sails.
A quick IMU and gimbal calibration after mounting can iron out any jitters. It’s like stretching before a run, but for a drone with delusions of being a steadicam.
Flight Performance: What Changes in the Air
Add weight, gain possibilities, and pay in flight time. That’s the exchange rate. The mount itself is almost negligible at 13 grams. The camera or light is the bigger budget item. With a small action cam or compact light, we should expect:
- Slightly reduced flight time.
- A touch more wind sensitivity.
- Possibly slower ascent/descents in gusty conditions.
- Increased noise, not so much in decibels as in the general busy-ness of air across surfaces.
In calm conditions, the Mini 4 Pro remains remarkably composed. It doesn’t fuss or pitch wildly. The mount’s stable fit helps minimize micro-sways that can show up as faint jitters in footage. If we’re adding a particularly chunky accessory, a wind check becomes our best friend. If the trees are swaying like a stadium crowd, it’s probably not the day to fly with extra gear.
Vibration, Jello, and All That Jazz
We’ve all seen it: the dreaded rolling jello effect in footage. The mount’s close fit and rigid design help ward that off. Still, a few best practices help:
- Ensure the long screw is snug; a loose fork mount can vibrate.
- Avoid stacking extra adapters unless necessary.
- If we suspect micro-vibrations, adding a tiny silicone washer between the adapter and device can help.
Ultimately, we’re bolting a second camera to a very small aircraft. A little humility—and a willingness to tweak—go a long way.
Why Attach Another Camera or Light?
Because the Mini 4 Pro’s built-in camera, lovely as it is, can’t be in two places at once. And sometimes we want:
- A wide, robust action cam angle for high-contrast scenes.
- A 360 camera position for reframing magic later.
- A pocket gimbal camera capturing us while the drone sees the world.
- A night or fill light to shape foreground or assist in low light, where permitted.
The mount gives us options without begging for an entirely new rig. It’s the multitasker, holding a light for a twilight roof inspection or hosting a GoPro for a mountain pass flight that just feels better with a little extra bite to the image.
Using GoPro and Other Action Cameras
GoPros and their cousins were born to be strapped to things. On this mount, they thrive. A few tips from our tinkering:
- Tighten the long screw until tilt is firm but adjustable. We don’t want droop mid-flight.
- Consider a slightly narrower field of view if props creep into frame.
- Turn on wind noise reduction if we’re recording audio directly to the action cam (for reference, if not for cinema).
Action cameras also give us redundancy. If the drone’s footage is in smooth cinematic mode, we can set the action cam to a flatter profile or a higher frame rate, building options for the edit.
Using DJI Osmo Action 4/3/2
Osmo Action cameras play nicely, especially with the action-camera fork mount. We often set them to a mid-level sharpness and a flatter color profile so grading aligns better with Mini 4 Pro footage. If we’re shooting in strong sun, an ND filter on the Osmo Action can help match motion blur.
One small note: depending on our orientation and tilt, make sure any magnetic mount shrouds or frames don’t add unintended drag. Clean mounting equals clean footage.
Using Insta360 ONE X3/X2/ONE R
With 360 cameras, positioning matters a lot. The beauty of 360 is reframing in post, but we don’t want props slashing across the frame unless that’s the look. Mounting the camera vertically and away from the props helps. Try a short selfie-stick-shaped adapter only if it’s light and won’t unbalance the drone; otherwise, keep it compact.
The stitching lines on 360 cameras can be sensitive to nearby surfaces. Ensure the mount head or adapter isn’t peeking into the camera’s stitch zones. A quick test shot on the ground can reveal these surprises before we burn battery in the sky.
Using DJI Pocket 3/2/1 and Fimi Palm 2/1
This is where things get delightfully quirky. Pocket cameras are essentially tiny gimbals on a stick, and mounting one on a flying gimbal system sounds like a dare. It can work—especially for capturing ourselves while the drone faces forward—but we should:
- Mount with the 1/4-inch adapter and keep cables to a minimum.
- Calibrate the pocket’s gimbal before takeoff if possible.
- Use a modest focal framing; extreme wide can catch props, and extreme tele magnifies shake.
We’ve found that pocket cams work best in calmer conditions, where the combined system can perform its ballet without getting smacked around by breezes that wish we’d taken up chess instead.
Using Night Lights and Fill Lights
Attaching a compact fill light can be transformative at dusk—on set, for inspection, or in controlled indoor environments. But let’s address the bright blinking elephant in the room: regulations. Night flying rules vary widely, and lights can trigger or intersect with those rules. Anti-collision lights might be required, or certain lighting might be restricted. We keep our local regulations in mind and err on the conservative side.
Practically speaking, a lightweight fill light with adjustable brightness is ideal. Keep it as centered as possible and choose a soft, even output to avoid harsh hotspots. The mount handles the weight; our job is to respect the air and the law.
The “Does It Block Anything?” Question
We touched on sensors earlier, but it’s worth repeating because it’s a key feature of this mount: it’s designed so that the Mini 4 Pro’s downward vision system remains unobstructed. That includes the precision landing and altitude hold cues it relies on near the ground.
We also want to watch for:
- Gimbal clearance in extreme tilts.
- Prop wash that can buffet a top-heavy device.
- The front field of view, if we’re pointing extras forward or below.
A short ground test with full stick movements can save us from discovering mid-flight that our light tries to headbutt the gimbal.
Durability and Maintenance
The material is tough, scratch-resistant, and not fussy. Still, we show it basic kindness:
- Wipe it down after sandy or dusty flights.
- Don’t leave it clamped on the drone in a hot car all week.
- Check the long screw for debris; a grit-grinding screw will chew through plastic over time.
The mount is a small thing that does a big job. Treat it like a trusted strap on a favorite bag.
Pros and Cons
We appreciate a clear ledger.
Pros:
- Simple, snug fit on the DJI Mini 4 Pro; no wobble when properly installed.
- Two mounting standards: action camera fork and 1/4-inch thread.
- Featherweight at 13g; barely impacts the drone on its own.
- Doesn’t block the downward vision sensor.
- Works with GoPro, Osmo Action, Insta360, Pocket, Fimi Palm, and compact lights.
Cons:
- Added device weight reduces flight time and can heighten wind sensitivity.
- Pocket gimbals and 360 cams may require extra care with placement and tilt.
- No included counterweight system; balancing is up to us.
- As with any external mount, prop visibility can creep into wide/360 frames.
Who This Is For
- Creators who want multi-angle coverage in one flight.
- Inspectors or hobbyists who need a light or secondary camera onboard.
- Travelers who prefer a minimalist kit and love the Mini 4 Pro but want extra options.
- Tinkerers—people like us—who enjoy turning a small drone into a Swiss Army knife, responsibly.
If we’re a strict minimal-weight purist, a mount like this may feel like a compromise. If we’re a pragmatist with a shot list and a sense of humor, it’s a smart, inexpensive way to stretch what the Mini 4 Pro can do.
Safety, Laws, and Etiquette
We remind ourselves of three realities:
- Adding accessories may push the total weight closer to regulatory thresholds. Check registration and labeling requirements if applicable in our region.
- Night flying and lighting are subject to rules. Anti-collision lights, line-of-sight obligations, and restrictions vary.
- People and property matter more than shots. If the wind kicks up or a park gets crowded, we pack up and head for an open field.
It’s not the thrilling part of flying, but neither is paperwork, and we still do our taxes.
A Quick Scenario Guide
Sometimes it helps to match the mission to the build. Here’s a quick cheat sheet we like to reference.
| Scenario | Suggested Device | Mount Adapter | Notes |
|---|---|---|---|
| Twilight property capture | Compact fill light | 1/4-inch | Check night flight rules; use soft light to avoid harsh glare |
| Action sports over water | GoPro or Osmo Action | Action camera fork | Use waterproof housing if necessary; secure the long screw firmly |
| 360 aerial shots for reframing | Insta360 ONE X3/X2 | 1/4-inch | Keep device vertical; verify no props in stitch lines |
| Self-capture with scenic backdrop | DJI Pocket/Fimi Palm | 1/4-inch | Calibrate gimbal; calm wind recommended |
| Quick reel with punchy edits | Any action cam | Action camera fork | Choose higher frame rate for flexibility in post |
We like to think of these as recipes. The ingredients are simple; the seasoning is our location and patience.
Common Troubles and Fixes
- Camera horizon tilts during flight:
- Recalibrate the Mini 4 Pro gimbal.
- Retighten the adapter; check for any twist in the mount.
- Jittery footage:
- Verify the long screw is snug.
- Add a small rubber or silicone washer between device and adapter.
- Reduce speed and avoid Sport mode in gusty wind.
- Downward sensor warnings:
- Ensure the mount isn’t misaligned.
- Clean the sensors and the mount contact area.
- Props in frame:
- Narrow the field of view or adjust camera tilt.
- Consider a modestly lower camera placement if available.
- Stuck long screw:
- Gently back it out while supporting both forks to avoid flex.
- Avoid tools that can strip the head; finger-tighten plus a small twist is usually enough.
Tips for Getting the Most Out of It
- Keep the setup compact. Smaller, lighter accessories always fly better.
- Do a 20-second hover test before every mission. If nothing drifts or chatters, we’re golden.
- Use ND filters on action cams to match motion blur with the Mini 4 Pro footage.
- Label our adapters. In a bag full of black parts, the right one loves to hide.
- Don’t stack adapters unless absolutely necessary. Every extra millimeter is extra leverage in the wind.
We’ve learned that good flying is a lot like good cooking: prep is not optional, and patience is the one spice we never regret adding.
Value for Money
The best accessory is one we use often. This mount earns its seat in the bag because it’s simple, tough, and flexible. We don’t need a different mount for each camera or a special bracket for a light. The included 1/4-inch adapter is genuinely useful, not a token. If we shoot often with multiple small devices, the cost pays back quickly in saved time and fewer headaches.
There are fancier solutions and heavier rigs, but for the Mini 4 Pro, “fancier” can be a synonym for “heavier,” which is not our friend. The BTG mount sits in that sweet spot where function meets restraint.
A Few Cautions Worth Repeating
- Weight matters. The mount is only 13 grams, but our accessory choice can turn nimble into lumbering if we’re not careful.
- Weather matters. A zephyr that seems charming on our face is less charming on a drone carrying a brickish light.
- Practice matters. Our first setup might not be perfect. Our second will be much better.
We try not to reinvent physics. We just nudge it politely.
A Practical Walkthrough of a Day’s Use
We pull into a quiet field. It’s early, and our coffee is still too hot for bravery. The Mini 4 Pro sits on the hood like a small, cooperative animal. We clip on the BTG mount—it clicks into place like it belongs there. Today we want a GoPro angle, something with punch and texture for the edit, so we add the action camera adapter and secure the long screw. The GoPro goes on next, a little tilt down to catch the trail and not just the horizon.
We power the drone. No error messages, no ominous “gesture of refusal.” Up it goes, steady and unbothered. A light breeze nudges it, but the additional weight is minimal. We steer a modest path, enough to test, not enough to tempt fate. The footage looks good—no jello, no props peeking in like uninvited party guests. We land, swap the GoPro for a compact fill light, and do a quick pass over the flowerbed that a friend insists is an art piece. It looks better with a touch of gentle light, and we admire the way a little brightness turns a mess of stems into something sculptural.
Back in the bag, the mount disappears into a tiny pocket. It’s the kind of accessory that doesn’t demand a ceremony. It works, and we move on with our day, which is all we wanted from it in the first place.
Care and Storage Notes
We store the mount in a small pouch to save it from at-large keys and coin shrapnel. If it gets sandy, a quick rinse and pat dry is enough. No oils or lubricants, just a clean surface to mate with the drone. We keep the adapters together so we don’t find ourselves muttering at a windy hillside, wondering where the 1/4-inch thread walked off to this time.
How It Compares to Other Options
We’ve seen stick-on plates, rubber band lash-ups, and stronger but heavier cages. The stick-on versions introduce adhesives we may regret later; band solutions can work but tend to vibrate; cages add protection and mounting options but can tip the Mini 4 Pro from agile to exhausted. The BTG mount stays minimal. It’s not a Swiss chalet with balconies; it’s a tidy stoop with just the right railing.
If we absolutely must rig a sprawling contraption with multiple accessories, we’d probably look elsewhere—or rethink the plan. The Mini 4 Pro does best with restraint, and this mount supports that philosophy.
Frequently Asked Questions
Q: Will this mount work with the DJI Mini 4 Pro only? A: It’s designed for the Mini 4 Pro’s body shape and sensor layout. That close fit is why it’s stable and doesn’t block the downward sensors.
Q: Does the mount include any cameras or lights? A: No. The packaging includes the mount itself and adapters; the drone and accessories are not included.
Q: How much does the mount weigh? A: Approximately 13 grams. It’s lightweight to avoid burdening the Mini 4 Pro.
Q: Does it block the downward vision sensor? A: No, it’s specifically designed not to. Still, we always double-check in the app before flight.
Q: What devices can we attach? A: GoPro Series, DJI Osmo Action 4/3/2, Pocket 3/2/1, Insta360 ONE X3/X2/ONE R, Fimi Palm 2/1, and compact lights with 1/4-inch threads.
Q: Is there a 1/4-inch adapter? A: Yes, it’s included and called a “gift.” It lets us attach any device with a standard tripod thread.
Q: How do we keep footage stable? A: Snug the long screw, keep the setup compact, avoid too much wind, and calibrate the gimbal if needed.
Q: Can we fly at night with a light attached? A: Only if it’s legal where we fly and we follow all relevant regulations. Check local rules carefully.
Q: Will props show up in the shot? A: Wide and ultrawide FOVs can catch props. Adjust tilt or FOV to minimize it.
Q: Does this affect flight time? A: The mount itself is minimal; the attached device affects flight time more. Expect some reduction when carrying a camera or light.
The Bottom Line We Keep Coming Back To
The BTG DJI Mini 4 Pro Drone Action Camera Mount Holder is the sort of accessory that earns our loyalty by being ordinary in all the right ways. It’s light, tough, and doesn’t try to be clever where cleverness gets in the way. It makes the Mini 4 Pro more versatile without a lecture or a learning curve.
We like that it respects the drone’s design—no sensor blocking, no ungainly bulk. We like that it says yes to two mounting standards, not just the fashionable one. And we especially like that it disappears when not in use, adding zero drama to our bag and only the tiniest flash of confidence to our shoot.
If we’re the sort of flyers who relish fresh angles and small, thoughtful solutions, this mount feels like a naturally good decision. It doesn’t change everything about the Mini 4 Pro. It changes just enough. And that, on most days, is exactly what we need.
Disclosure: As an Amazon Associate, I earn from qualifying purchases.
