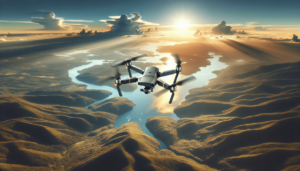
Have you ever found yourself gazing at drone footage and wondered, “How do they make the world look so stunning from above?” We, too, have asked ourselves that question, especially as we’ve dabbled more into the fascinating world of aerial photography. It’s all about angles, timing, and, importantly, filters. Getting the right perspective is easy once you’ve mastered flying your drone, but capturing that breathtaking shot requires a bit more technical knowledge—particularly when it comes to choosing the right filters. With a bit of know-how, we can transform ordinary aerial shots into spectacular visions of our world. Let’s take a relaxed stroll through the art of enhancing our drone photography with filters, with some tips sprinkled in along the way.

Understanding the Role of Filters in Aerial Photography
Filters are those magical little things that can dramatically alter an image’s quality and mood. Much like sunglasses for your drone’s camera, filters help manage light exposure and enhance colors. But what exactly do these gadgets do, and why are they relevant in aerial photography?
Imagine taking a photo on a bright sunny day. Without a filter, the sky might appear washed out, with harsh shadows and glaring sunlight. But with the right filter, you control overexposure and improve colors, making our images pop with vibrant details. Filters also cut down reflections and glare that typically plague aerial shots, making them an indispensable tool for drone photographers.
Why Lighting Conditions Matter
We’ve all found ourselves squinting at a screen because the light wasn’t quite right, haven’t we? Lighting makes all the difference in photography, especially from high altitudes. Whether it’s the golden hours of sunrise or sunset, or the glaring midday sun, each has its challenges and joys. Filters help adjust our drone camera’s approach to these varied lighting conditions, ensuring we capture perfect snapshots of the Earth’s canvas.
Types of Filters for Drone Photography
To get the best out of our drone shots, we need to familiarize ourselves with the types of filters available. Choosing the right one can be a bit like trying to pick the perfect bowl of oatmeal – not too hot, not too cold, but just right. Let’s go through some of our filter options.
ND (Neutral Density) Filters
ND filters are our go-to when it comes to controlling exposure. They reduce the amount of light that hits the camera sensor, allowing for longer exposures and providing smoother footage. Think of them as the sunscreen for our drone’s camera — keeping everything nicely balanced when the sun is too strong.
- ND4 Filter: Perfect for cloudy days to reduce light minimally.
- ND8 Filter: Best for partially cloudy conditions; manages moderate exposure.
- ND16 Filter: Ideal for bright, sunny conditions.
- ND32 Filter: Great for those incredibly bright days when the sun’s glare makes everything look blinding.
Polarizing (PL) Filters
These are a favorite among many aerial photographers for their ability to enhance colors and reduce glare and reflection. Remember those picturesque beaches with turquoise waters you’ve admired? Chances are, a polarizing filter helped capture those stunning visuals. PL filters also make skies appear deeper, bringing out clouds’ definition.
UV Filters
While often underestimated, UV filters are particularly good at minimizing ultraviolet light’s interference — a common culprit that causes a hazy appearance in images. They’re a simple yet effective tool to protect our lens and improve sharpness of the pictures without altering exposure.
Graduated ND Filters
Selection gets more nuanced with graduated ND filters. These are precisely designed to tackle scenes with varying light intensities, like the sky versus land. The filter is darker at the top and gradually becomes clear towards the bottom, balancing exposure across the scene.
How to Choose the Right Filter
Now that we know the options, which filter should we pick? The choice largely depends on the scene and the aesthetic we’re aiming for. This decision is akin to choosing the right pair of shoes before heading out — practical and stylish choices make a perfect combo.
Matching Filter to Conditions
Different light conditions call for different filters, just like seasons call for different attire. Regarding bright sunny days, ND16 or ND32 filters would be ideal. Cloudy day shooting? ND4 has things covered. When we aim to capture colors distinctly in high contrast, polarizing filters are our best allies.
Considering the Subject
Think about what we’re shooting, as some filters may enhance certain elements of our subject more than others. For landscape shots, where capturing a vivid blue sky is key, a polarizing filter would do wonders. Shooting over water or shiny landscapes? Again, polarization is our friend. Meanwhile, an ND filter helps maintain a natural feel for more neutral landscapes.
Practical Tips for Using Drone Camera Filters
Okay, we have chosen our filters, now what? It’s time to master some practical hacks to ensure successful drone photography adventures. Here’s a little guide.
Setting Up Properly
Before takeoff, ensure that our filters are clean, dust-free, and properly attached to the camera—there’s nothing more frustrating than buzzing around only to realize smudged filters ruined all our shots.
Planning and Testing
Remember, patience is also a filter of sorts—it filters our impulses to hurry and helps us plan. Before hitting record, take time to test different settings and filters to see what best suits the environment.
Balancing Exposure
Whether you’re controlling your camera’s exposure or coordinating the use of ND filters, finding that balance is key. Practice makes perfect, so do plenty of test flights in different lighting to become adept at balancing exposure.
Post-Processing Essentials
Filters can only do so much; post-processing is where we put the cherry on top. With software like Adobe Lightroom or Photoshop, we can adjust saturation, contrast, and other elements to further enhance our images while staying true to our artistic vision.
| Filter Type | Best Used For | Conditions |
|---|---|---|
| ND4 | Cloudy/overcast conditions; reduce light reflection | Mildly cloudy |
| ND8 | Mild sunny days; moderate exposure control | Partly cloudy |
| ND16 | Bright sunny days; strong sunlight balance | Sunny |
| ND32 | Extra bright conditions; maximum exposure control | Very sunny |
| Polarizing (PL) | Enhancing colors; reducing glare/reflection; deep blue skies | Various, especially water bodies/landscapes |
| UV | General lens protection; reducing hazy appearance | Primary protection |
| Graduated ND | Balancing scenes with varying brightness (sky vs. ground) | Uneven lighting |

Common Mistakes and How to Avoid Them
Yes, we’ve been there: looking back at our shots only to see they didn’t turn out quite as planned. Common mistakes can creep in, but knowledge can fortify us against these woes.
Overuse of Filters
We sometimes get entranced by our filters and overuse them. This can lead to overly dark or unnatural-looking images. Moderation and practice help find the sweet spot between enhancement and exaggeration.
Ignoring Weather Conditions
Operating our drones in windy or rainy conditions isn’t ideal and can result in shaky footage or damaged equipment. Wherever possible, we should wait for the optimal weather before embarking on our aerial adventures.
Improper Filter Attachment
A loose filter is as useless as a spaghetti strainer in a rainstorm. Double-check to ensure they are secure; otherwise, it’s a sure way to spoil our grand plans.
Embracing Aesthetics with Filters
By now, it should be clear that using filters isn’t just a technical exercise; it’s about embracing an aesthetic. Filters are there to help convey our vision of the world, much like a personal sense of style enhances our confidence.
Filters allow us to manipulate the way our audience sees a scene, offering them an interpretation filled with emotion and drama we seek to express. Whether it’s capturing the bold beyond in broad daylight or the gentle whispers of twilight, these tools enable us to craft the story we wish to tell.
Final Thoughts on Choosing the Right Filters
Selecting the appropriate filters isn’t just picking another piece of equipment; it’s about making decisions that shape how we share visual narratives. As we’ve carefully navigated through our choices and explored thoughtful application, we recognize the importance of marrying our artistic desires with practical necessities.
In our journey through aerial photography, filters unlock a universe of creative possibilities. They help heighten the magic of flying cameras by adding layers of depth, contrast, and beauty to ordinary landscapes. We’re creating art with each flight, and the right filters turn this innate curiosity into visually compelling tales.
Let’s get into the sky!
![7 Essential Aerial Photography Tips For Beginners [2025]](https://droneaperture.com/wp-content/uploads/2025/01/7-essential-aerial-photography-tips-for-beginners-2025-1-300x171.png)