Have you ever looked up into the sky and wondered how the world would appear from a bird’s-eye view? The notion of soaring high and capturing breathtaking landscapes was once a preserve of those with wings—or at least those aboard flying machines. Today, we have drones, nifty devices that have shrunk the world and expanded our reach to capture stunning aerial photographs. Let’s chat about the art and technique of elevating your photography skills with drones.
The Allure of Aerial Photography
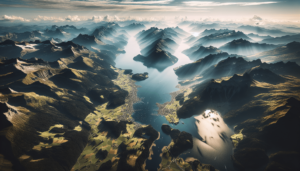
First, why are we so captivated by aerial shots? Perhaps it’s because they present the world in a way that we don’t often see it—at least not without sitting by an airplane window mid-flight and craning our necks past fellow passengers. We are fascinated by the broad sweep of landscapes, the geometric patterns of cityscapes, and the beauty of nature from above. Drone photography takes these awe-inducing vistas and places them at our fingertips, stirring our sense of adventure and creativity.
Why Drones Are Game-Changers
Drones are revolutionizing photography, not just because they can fly (though that’s a huge part), but because they democratize access to perspectives once reserved for those who could afford helicopters and pilots. We now have the ability to capture unique shots that stand out from land-bound photography. They provide this fantastic blend of technology and artistry, allowing us all to become the aerial photographers we always dreamed of being.
Choosing the Right Drone for Aerial Photography
Selecting the right drone can feel like searching for a needle in a high-tech haystack. We are bombarded with myriad options, each boasting different capabilities, features, and… price tags. to boot. How do we choose the best fit for our needs?
Key Features to Consider
- Camera Quality: A high-resolution camera is crucial. Look for drones with at least 12 megapixels for photos and 1080p for video, although 4K video capabilities are becoming more common and desirable for high-definition captures.
- Stability and Gimbal: A good gimbal ensures stability, which is key to taking smooth video and clear photos. Persistent shakiness isn’t a good look.
- Battery Life: We need enough power to not crash land mid-shot. Look for drones with at least 20 to 30 minutes of flight time.
- Range: The farther it can travel, the more creative freedom we have. Keep an eye on the maximum range and control features of the drone.
Our Top Drone Picks
| Drone Model | Camera Quality | Flight Time | Range | Price Range |
|---|---|---|---|---|
| DJI Mavic Air 2 | 48 MP, 4K | Up to 34 min | 10 km | $799 – $999 |
| DJI Mini 2 | 12 MP, 4K | Up to 31 min | 10 km | $499 – $699 |
| Autel EVO Nano+ | 50 MP, 4K HDR | Up to 28 min | 10 km | $599 – $799 |
| Parrot Anafi USA | 21 MP, 4K | Up to 32 min | 5 km | $7,000+ |
Here are some choices based on balancing quality, price, and suitability for intermediate enthusiasts to professionals.

Mastering the Basics of Drone Photography
Now that we have our trusty flying technology, let’s talk about mastering drone photography. Yes, there’s more to it than just hitting the “capture” button from the sky.
Learning the Controls
Let’s face it: Before unleashing our inner shutterbug, we must become adept at piloting these futuristic contraptions. So, what’s our game plan?
- Simulator Practice: Just as pilots use simulators, many drones come with applications allowing practice flights on your smartphone before taking them to the skies.
- Start Simple: Begin flying in open areas, away from crowds and obstructions. It minimizes risk while we learn the ropes.
- Smooth Movements: Avoid jerky motions. Gentle, gradual movements ensure steadier shots and give our footage a more cinematic touch.
Camera Settings
Next, let’s geek out just a touch with camera settings. Understanding them will open creative avenues tailored to our individual photographic style.
- ISO and Aperture: Manage light sensitivity (ISO) and control depth of field with aperture settings. Generally, daylight shots mean lower ISO settings.
- Shutter Speed: This affects motion blur. Are we going for sharp, freeze-frame shots or artistic blur?
- Resolution Choices: Use the highest resolution available to capture the most data, giving us flexibility in editing.
Planning Our Shots: Before We Take Off
Creating stunning aerial photography often depends more on pre-planning than spur-of-the-moment creativity. Here’s how we ensure our shots are award-worthy before even taking off.
Scouting Locations
Not every beautiful landscape translates into a great aerial shot. We should scout and choose locations wisely. Consider interesting patterns, leading lines, and natural symmetry. Google Earth is a fantastic tool for virtually scouting potential areas. Once chosen, visiting the site on foot can also help visualize possible angles and shot compositions.
Considering Timing & Lighting
Time of day drastically affects how our shots turn out. Early morning and late afternoon, known as the golden hours, often cast soft, warm light and present shadows that add depth to photos.
Golden Hour vs. Blue Hour
- Golden Hour: Right after sunrise or before sunset. Best for warm tones and softer lighting.
- Blue Hour: The twilight period just before sunrise or after sunset. Provides cooler tones and can seamlessly capture city lights.
| Time | Pros | Cons |
|---|---|---|
| Golden Hour | Warm lighting, pronounced shadows | Limited time frame |
| Blue Hour | Dramatic sky, subdued colors | Low light might require higher ISO |
It’s not just about when but also how the light interacts with our subjects.

Perfecting Composition
We’ve heard it said that good composition can turn an ordinary photograph into an extraordinary one. This is true for aerial photography as well.
Rule of Thirds: A Timeless Guideline
Divide your frame into nine equal parts with two horizontal and two vertical lines. Place the subject or the point of interest along these lines or their intersections to create balance and draw viewers’ eyes naturally.
Leading Lines
Our brains love order and direction. Leading lines like roads, rivers, or the natural shape of landscape features guide the viewer’s eye and can add dynamism to the shot.
Birds’ Eye and Oblique Angles
Playing with angles can dramatically alter the perception of a photograph:
- Birds’ Eye View: Delivers a flattening effect, highlighting patterns and symmetry.
- Oblique View: Provides depth and a sense of scale, ideal for showcasing height or vastness.
Editing: Enhancing Our Aerial Masterpieces
Post-processing is where our photos often come to life. It’s like cooking; the ingredients are important, but the method and additions define the dish.
Selecting the Right Software
A wealth of options lies at our fingertips, catering to beginner and expert levels alike.
- Adobe Lightroom & Photoshop: Classics in the photography world, known for exhaustive tools and customizability.
- Capture One: Favored for its exceptional color handling.
- Affinity Photo: An affordable alternative with powerful features.
Touch-up Techniques
- Adjust Exposure: Balance out our light and shadows to ensure details aren’t lost.
- Enhance Colors: Slight saturation adjustments can make colors pop without overdoing it.
- Sharpen Details: Subtle sharpening can lend crispness to the final image.
The Art of Restraint
The goal with editing is to enhance without overshadowing the natural beauty of the photograph. It’s all too easy to fall down a rabbit hole of filters and manipulations. Less can indeed be more.
Safety and Legal Considerations
It’s vital to remember that drones are not just toys. They’re subject to regulations designed to protect others and ourselves. Let’s have a chat about staying on the right side of the law.
Understanding Drone Regulations
Most countries have regulations on drone usage, often concerning height limits, no-fly zones (such as near airports), privacy concerns, and more. It’s critical to stay informed to avoid fines and legal headaches.
Safety Tips
- Check the Weather: Windy days aren’t our friends. Fly in reasonable conditions to ensure control.
- Manage Battery Levels: Always keep an eye on battery life and set a return-to-home feature to avoid crashes.
- Respect Privacy: Just because we can fly, doesn’t mean we should. Respect other’s privacy and personal space.
Conclusion: Soaring to New Heights
Taking to the skies with a camera in tow is more than just a technical undertaking—it’s an artistic adventure. Whether we’re seasoned photographers or enthusiastic amateurs, drones open a canopy of opportunity to view the world from above. We’ve explored the ins and outs of crafting stunning aerial shots, from selecting the right drone, planning and capturing stellar compositions, to the final polish in editing. At the heart of it all, it’s our unique perspective behind the controls that truly captures the world in ways unmatched by traditional photography. Let’s embrace the skies and capture the beauty that lies both in plain sight and hidden from our usual view. Here’s to adding a fresh angle to our photography journey.
![7 Essential Aerial Photography Tips For Beginners [2025]](https://droneaperture.com/wp-content/uploads/2025/01/7-essential-aerial-photography-tips-for-beginners-2025-1-300x171.png)